OLD MAPS
< CORE RULESCONTENTS
OCTARIUS
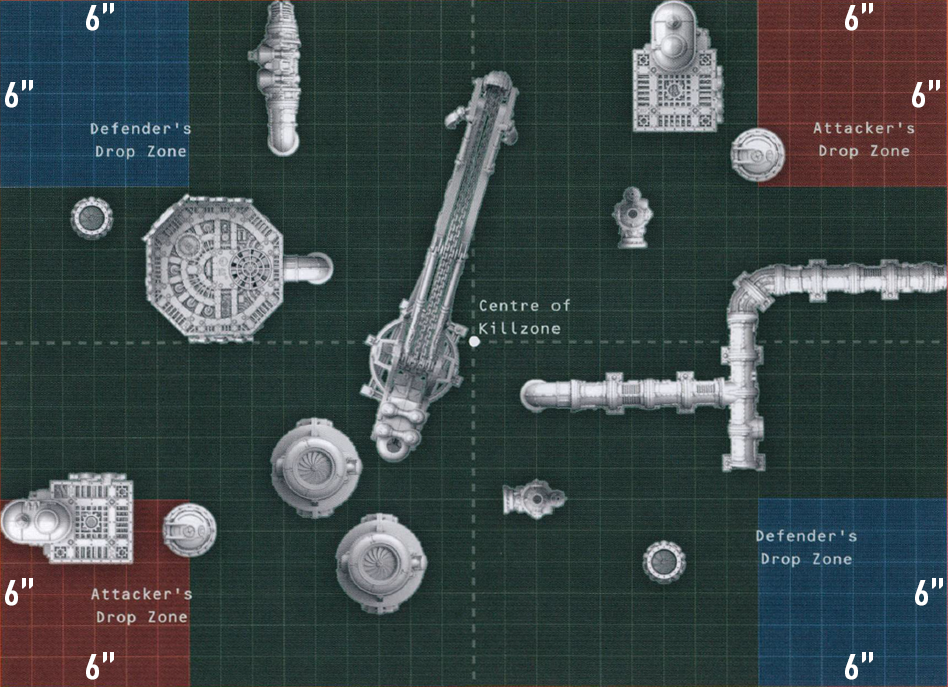
1.2. SEARCH AND RETREIVE
SCENARIO RULES
Operatives can perform the following mission action:
| SEARCH FOR RELIC | 1AP |
|---|---|
|
An operative can perform this action while within control range of a Scrap Pile it controls that has not been searched by a friendly operative during this turning point. Until the start of the next Turning Point, that Scrap Pile has been Searched by your operatives. Each Scrap Pile can be Searched a maximum of four times during the battle. Each time this action is performed, if the Relic has not yet been discovered, roll one D6: on a 6+, the Relic has been discovered and you must place an objective marker to represent the Relic within control range of the operative that discovered it. The Pick Up Marker action can be performed upon the Relic objective marker. While an operative is carrying the Relic objective marker, it can not perform the Dash action. The operative cannot perform this action while within control range of enemy operatives, or if enemy operatives control the Scrap Pile |
|
SCENARIO EQUIPMENT
Operatives can be equipped with the following equipment:
ARCHEO-AUSPEX 1EP
Each time an operative with this equipment performs the Search for Relic action, add 1 to the dice roll to see if the Relic is discovered.PRIMARY OBJECTIVE
- Each time a friendly operative performs the Search for Relic action, you score l VP (to a maximum of 3VPs per player per turning point).
- If a friendly operative discovers the Relic, you score an additional 1 VP.
- If a friendly operative controls the Relic objective marker at the end of the battle, you score an additional 2VPs (score 3VPs instead if a friendly operative is carrying the Relic objective marker).
2.1. ELIMINATE TARGET
SCENARIO RULES
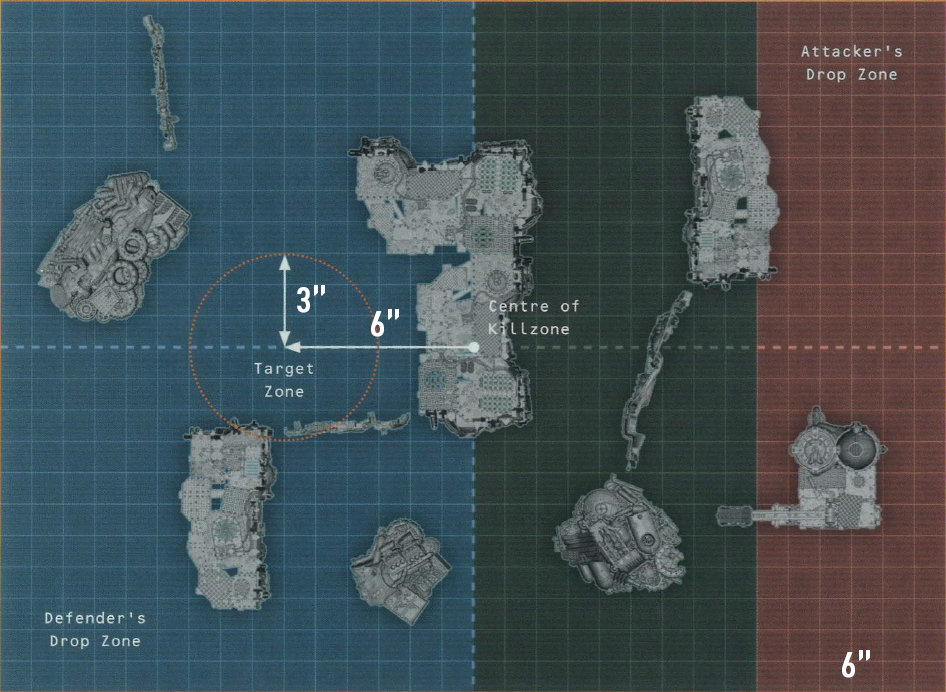
Commander: Before players set up their kill teams, the Defender must select one model to be the Commander. If any of their Operatives are a LEADER, they must choose one of them. The Commander must be set up wholly within the target zone, and must start the battle within this zone (it cannot use any abilities or scouting options to move out of this zone before the battle begins).
The Defender's Commander can perform the following mission action:
| OVERSEE PLANS | 1AP |
|---|---|
|
The Defender's Commander can perform this action while it is wholly within the target zone. If a Commander performs this action, until the end of the turning point, it cannot perform any other actions. |
|
Surprise Attack: The Attacker decides who has the initiative in the first turning point.
SCENARIO EQUIPMENT
The Defender's operatives can be equipped with the following equipment:
AUTO-MEDICAE 1EP
Once per turning point, one operative equipped with an auto-medicae can perform the following action:
| ADMINISTER MEDICAE | 1AP |
|---|---|
|
An operative can perform this action if their Commander is Visible to and within control range of it. Each time this action is performed, that Commander regains 2 lost wounds. The operative cannot perform this action while within control range of enemy operatives. |
|
PRIMARY OBJECTIVE
- Each time the Defender's Commander performs the Oversee Plans action, the Defender scores 2VPs.
- At the end of the battle, whichever player controls the target zone scores 3VPs. A player controls the target zone if the combined APL of all friendly operatives within the target zone is greater than the combined APL of all enemy operatives within the target zone.
- At the end of the battle, if the Defender's Commander has all of its Wounds remaining, the Defender scores 1 VP.
- At the end of the battle, if the Defender's Commander is Injured, the Attacker scores 6VP (if the Defender's Commander is Incapacitated, the Attacker scores 9VPs instead.
2.2. SABOTEURS
SCENARIO RULES
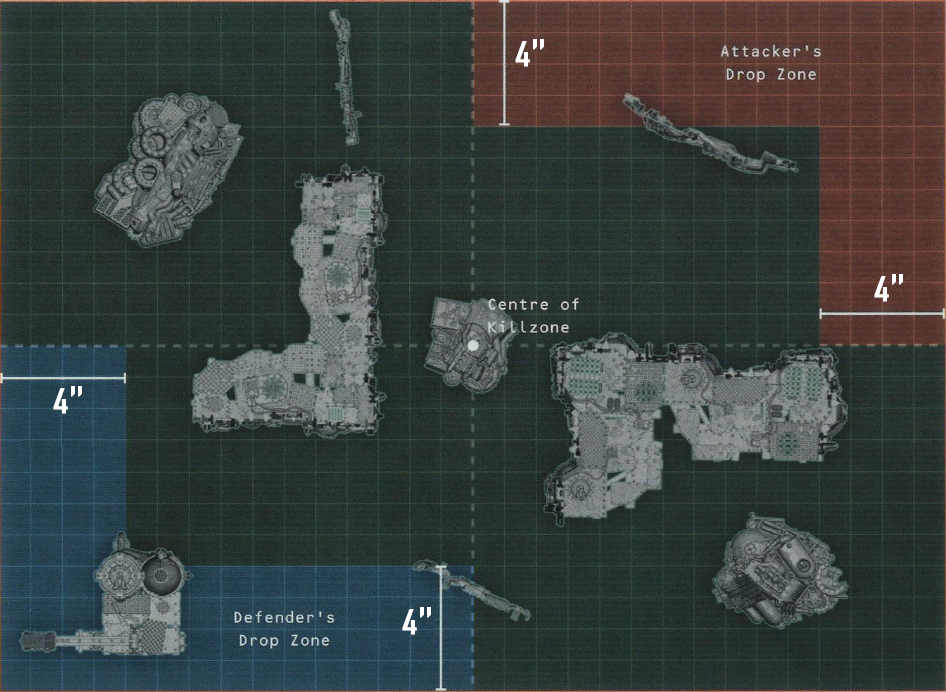
Ruse: After the Defender has selected their kill team, they must divide their kill team into two forces, with as equal a number of models in each as possible. The Attacker then selects one of these forces: that force has been lured away by a ruse and the operatives in it will not start the battle on the killzone, but will arrive later during the battle.
It's a Decoy, Return to Base: At the start of the Strategy phase of the second Turning Point, the Defender rolls one D6 for each of their operatives that were in the force that were lured away by the Attacker's ruse. On a 4+, that operative has returned to the killzone and the Defender can set that operative up anywhere that is wholly within their drop zone, wholly within 3" of a killzone edge and not within control range of enemy operatives. At the start of the Strategy phase of the third Turning Point, all of the Defender's remaining operatives who were lured away by the Attacker's ruse return to the killzone, and are set up anywhere that is wholly within 3" of a killzone edge and not within control range of enemy operatives.
The Attacker's operatives can perform the following mission action:
| PLANT EXPLOSIVES | 1AP |
|---|---|
|
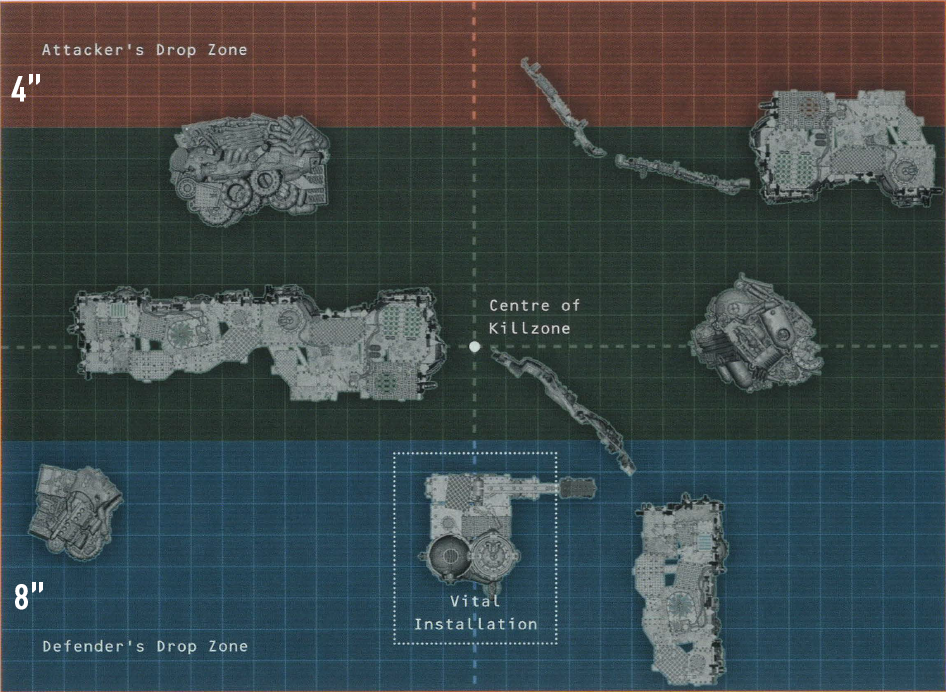
The Attacker's operatives can perform this action while they are within control range of the vital installation. Each time this action is performed, that structure suffers 1 Damage point (if the operative is atop the vital installation's Vantage Point when this action is performed, it suffers 2 Damage points instead). If an operative performs this action, until the end of the Turning Point, they cannot perform any Charge or Shoot actions. The operative cannot perform this action while within control range of enemy operatives. |
|
SCENARIO EQUIPMENT
The Attacker's operatives can be equipped with the following equipment:
MELTA CHARGE 1EP
Each time an operative equipped with melta charges performs the Plant Explosives action, the vital installation suffers 1 additional Damage point.
The Defender's operatives can be equipped with the following equipment:
EMERGENCY VOX 1EP
Each time you roll to see if an operative returns to the killzone, if that operative is equipped with an Emergency Vox, add 1 to the dice roll.
PRIMARY OBJECTIVE
At the end of the battle, the players score a number of victory points d epending on how many Damage points the vital installation suffered, as shown below:
| Damage suffered by Vital Installation | Attacker VP | Defender VP |
| 0 | 0 | 12 |
| 1-3 | 4 | 8 |
| 4-6 | 8 | 4 |
| 7+ | 12 | 0 |
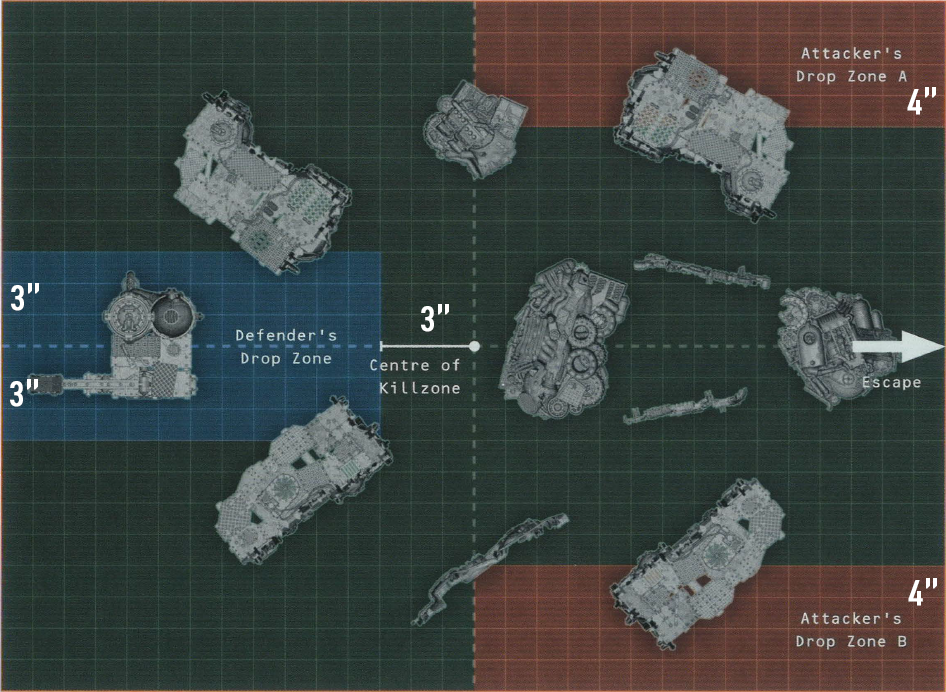
3.1. AMBUSH
SCENARIO RULES
Concealed Positions: In this mission, the Attacker must set up all their operatives first, using concealed deployment. To do so, first assign a unique number to each friendly operative in your kill team. Then, instead of setting up the operative on the killzone, you instead set up a marker with that operative's number on face down (you can alternatively place a number or dice next to the marker, just so long as it corresponds to one of your operatives and is kept secret from your opponent for now). The Attacker must set up their markers between their two drop zones as evenly as possible.
Once all the Attacker's Concealed Deployment markers are set up, the Defender then sets up their entire kill team as normal. Once they have done so, the Attacker's Concealed Deployment markers are all turned face up and replaced with the corresponding operative.
Element of Surprise: The Attacker decides who has the initiative in the first Turning Point.
Escape: The Defender's operatives can move off the Attacker's killzone edge. If they do, they are said to have escaped and take no further part in this mission, but do not count as having been incapacitated for any rules reasons.
SCENARIO EQUIPMENT
The Attacker's operatives can be equipped with the following equipment:
DECOY 1EP
For each operative in your kill team that is equipped with a decoy, you can set up one additional Concealed Deployment marker when you set up your forces. This marker is blank, and is removed after all other nondecoy markers have been replaced with operatives.
The Defender's operatives can be equipped with the following equipment:
SCANNERS 2EP
For each operative in your kill team that is equipped with scanners, you can, before setting up any of your operatives during deployment, select one Concealed Deployment marker on the killzone. The Attacker must turn the marker face up and, if it is an operative, replace that marker with the corresponding operative.
PRIMARY OBJECTIVE
- Each time one of the Defender's operatives escapes, the Defender scores 2VPs.
- Each time one of the Defender's operatives is incapacitated, the Attacker scores 2VPs.
3.2. EVAC INBOUND
SCENARIO RULES
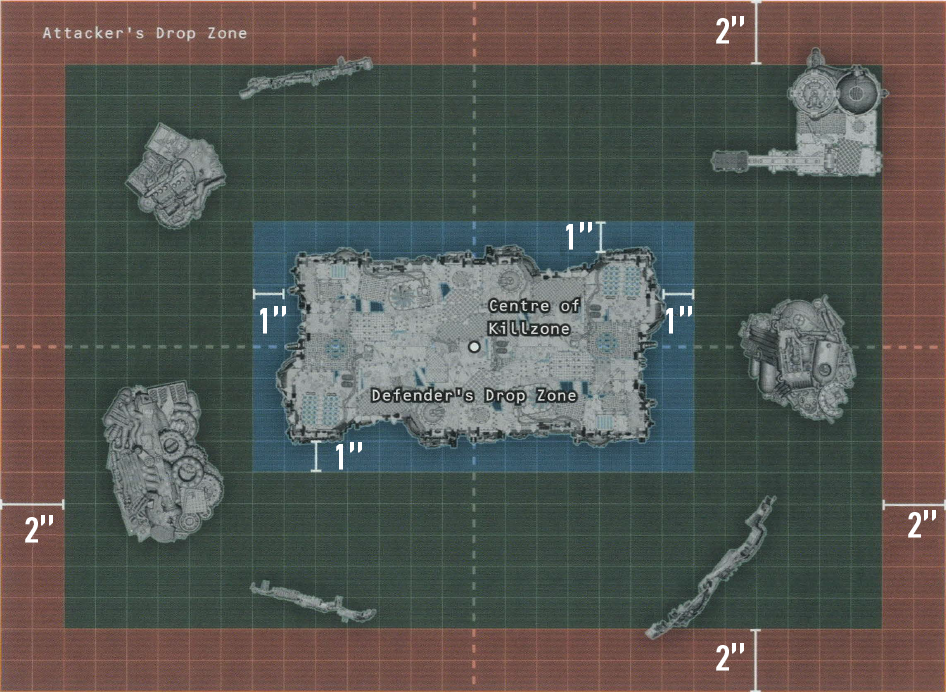
Surrounded: In this mission the Defender does not have a killzone edge. In contrast, any and every killzone edge counts as the Attacker's killzone edge.
Fort: The four Wall terrain features in this mission are combined to create a single Fort. Operatives cannot move into this Fort - they must instead climb onto its Vantage Point.
Relief Forces Inbound: After the Defender has selected their kill team, they must divide their kill team into two forces, with as equal a number of models in each as possible. The Attacker then selects one of these forces: that force is the Relief Force and will not start the battle on the killzone, but will arrive later during the battle. Operatives in the other group are known as the Spies.
Reinforcements Have Arrived: At the start of the Strategy phase of the second Turning Point, the Defender rolls one D6 for each of their Relief Force operatives: on a 4+, that operative has returned to the killzone and the Defender can set that operative up anywhere that is wholly within 3" of any battlefield edge and not within control range of an enemy operative. At the start of the Strategy phase of the third Turning Point, all of the Defender's remaining Relied Force operatives return to the killzone, and are set up anywhere that is wholly within 3" of any battlefield edge and not within control range of an enemy operative.
Low Ammo: For Spy operatives, all ranged weapons with Ammo weapon rule are counted as having twice less ammo (rounding up). Weapons with no Ammo weapon rule are counted as having Ammo 3 weapon rule. Weapons with Ammo ∞ weapon rule are counted as having Ammo 12 weapon rule instead.
SCENARIO EQUIPMENT
The Attacker's operatives can be equipped with the following equipment:
JAMMERS 1EP
Once per Turning Point, when the Defender rolls to see if a Relief Force operative arrives in the killzone, an operative equipped with jammers can use them. If they do, the Defender must subtract 1 from the dice roll.
The Defender's operatives can be equipped with the following equipment:
SPARE AMMO 1EP
Once per battle, when this operative Reloads (or at the Ready Operatives step of the first turning point), one of this operative's weapons may have its normal Ammo rule.
PRIMARY OBJECTIVE
- At the end of each Turning Point, the Defender scores 1 Victory point for each of their Spy operatives that are on a Vantage Point of a terrain feature that is wholly within their drop zone (to a maximum of 3VPs per Turning Point).
- Each time one of the Defender's Spy operatives is incapacitated, the Attacker scores 3VPs.
- At the end of the battle, for each of the Defender's Spy operatives that are on the battlefield and injured, or that are on the battlefield but not on a Vantage Point of a terrain feature that is wholly within their drop zone, the Attacker scores 1 VP.
CHALNATH
1.1. SECURE THE RELICS
SCENARIO RULES
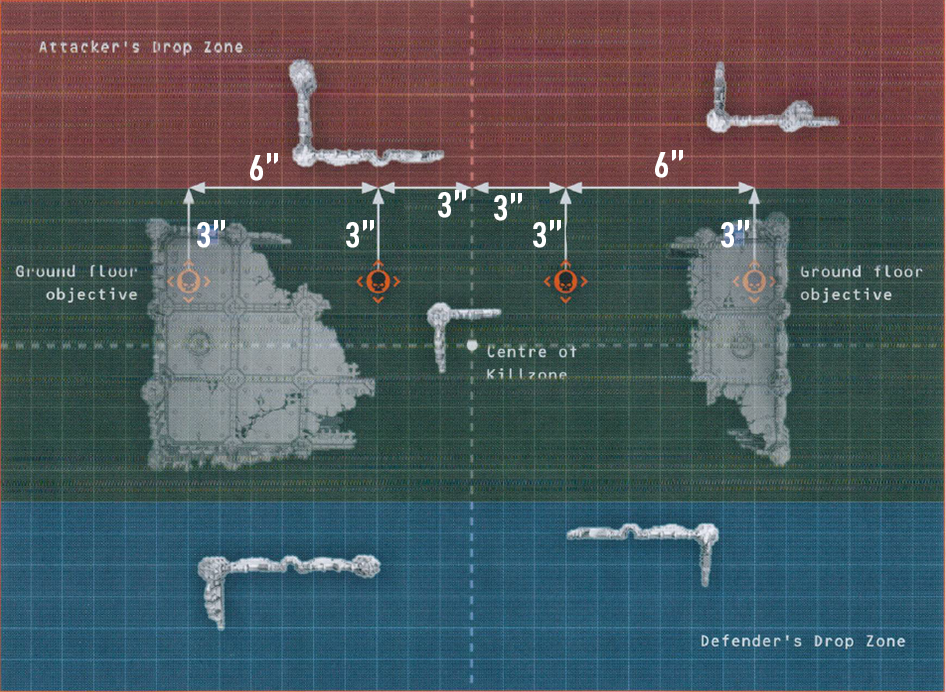
Relics: The Pick Up Marker action can be performed upon an objective marker by the Defender's operatives.
PRIMARY OBJECTIVE
At the end of each Turning Point, the Defender scores 2VP for each objective marker that is within their drop zone or being carried by a Defender operative that is within their drop zone.
At the end of each Turning Point after the first, the Attacker scores 1 VP for each objective marker that is not in the Defender's drop zone.
1.2. DEFEND THE POSITION
SCENARIO RULES
The Defender's operatives can perform the following mission action:
| LOCKDOWN | 1AP |
|---|---|
|
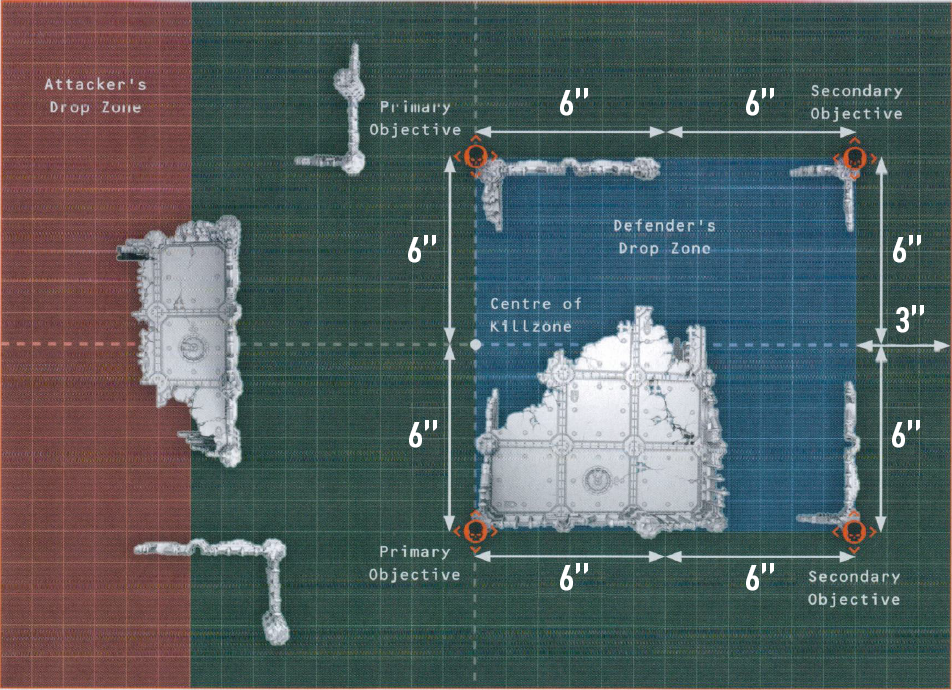
Until the start of the next turning point, for the purposes of determining who controls that objective marker, that operatives APL is treated as being one higher (to a maximum of 4). An operative can perform this action while within control range of an objective marker and not within control range of enemy operatives. |
|
SCENARIO EQUIPMENT
The Defender's operatives can be equipped with the following equipment:
DEPLOYABLE BULWARK
Once per battle, this operative can perform the following action:
| DEPLOY BULWARK | 1AP |
|---|---|
|
Set up Portable Barricade within control range of this operative and not within 2" of other terrain features. This operative cannot perform this action while within control range of enemy operatives. |
|
PRIMARY OBJECTIVE
- At the end of each Turning Point, if Defender operatives control both primary objective markers, the Defender scores 1VP.
- At the end of each Turning Point, if Defender operatives control both secondary objective markers, the Defender scores 1 VP.
- At the end of each Turning Point, for each objective marker Attacker operatives control, the Attacker scores 2VP.
1.3. ESCORT
SCENARIO RULES
The Defender's operatives can perform the Pick Up Marker action on the Diplomat objective marker.
SCENARIO EQUIPMENT
The Defender's operatives can be equipped with the following equipment:
SHROUDSHIELD 3EP
While this operative is in control of the Diplomat objective marker, each time an enemy operative makes a shooting attack, treat this operative as if it has a Conceal order.
PRIMARY OBJECTIVE
At the end of each Turning Point:
- If a Defender's operative controls the Diplomat objective marker, the Defender scores 1 VP.
- If an Attacker's operative controls the Diplomat objective marker, the Attacker scores 2VP.
At the end of the battle:
- If the Diplomat objective marker is in the Attacker's drop zone and controlled by a Defender's operative, or a Defender's operative that is carrying the Diplomat objective marker is within the Attacker's drop zone, the Defender scores 4VPs.
- If the Diplomat objective marker is not controlled by a Defender's operative and is not within 6" of the Attacker's drop zone, or a Defender operative that is carrying the Diplomat objective marker is not within 6" of the Attacker's drop zone, the Attacker scores 4VPs.
2.1. RETRIEVE INFORMATION
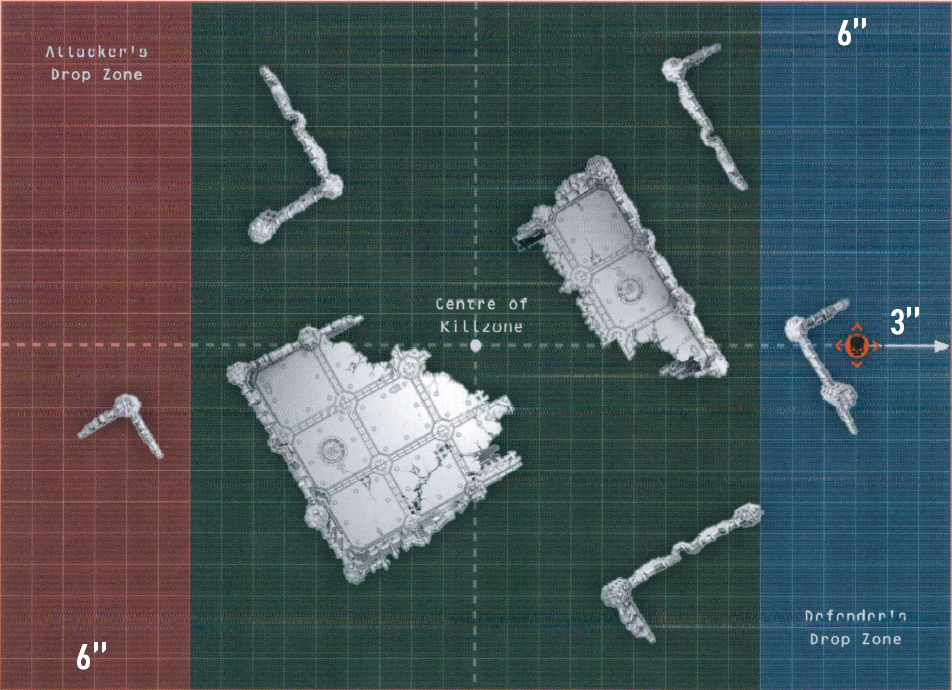
SCENARIO RULES
The Attacker's operatives can perform the following mission action:
| DOWNLOAD SCOUTING REPORT | 2AP |
|---|---|
|
An Attacker's operative can perform this action while within control range of an objective marker that they control and not within control range of an enemy operative. This action can only be performed on each objective marker once. |
|
PRIMARY OBJECTIVE
At the end of each Turning Point, the Defender scores 1 VP for each objective marker friendly operatives control (to a maximum of 3 VPs per Turning Point).
At the end of the battle, the Attacker scores 3VPs for each objective marker that has had the Download Scouting Report action performed on it.
3.3. EXEMPLAR
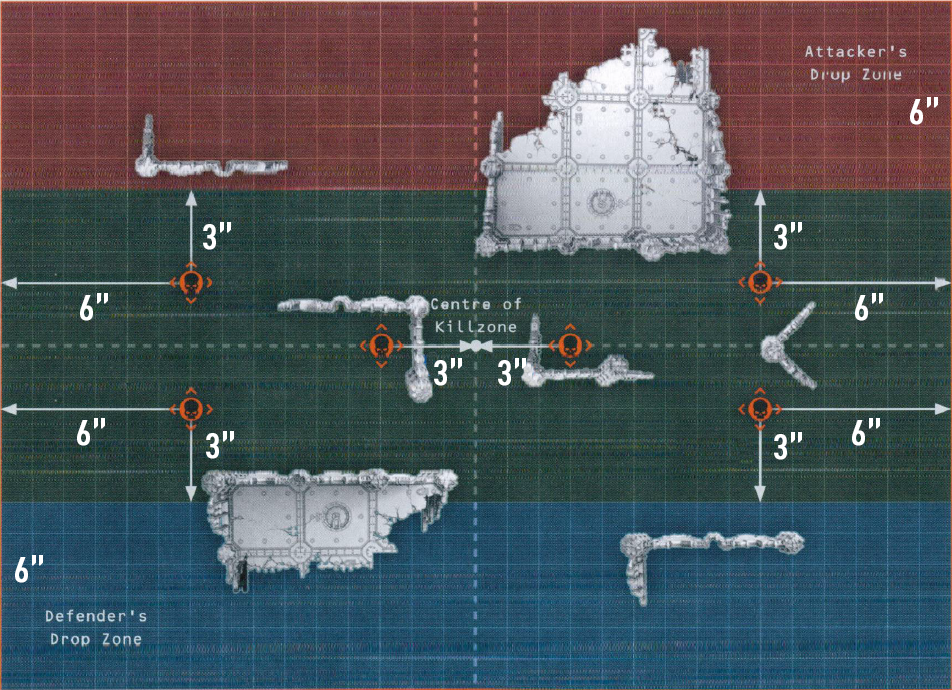
SCENARIO RULES
The Attacker's operatives can perform the following mission action:
| PLANT EXPLOSIVES | 1AP |
|---|---|
|
An operative can perform this action if it is not within Engagement Range of an enemy operative and is within ^ of an objective marker it controls. Unless an operative performs the Defuse Explosives action on that objective marker, it is destroyed at the end of the Turning Point (see Destroyed Objectives, below). |
|
The Defender's operatives can perform the following mission action:
| DEFUSE EXPLOSIVES | 1AP |
|---|---|
|
An operative can perform this action if it is not within control range of an enemy operative and controls an objective marker, if Plant Explosives action was performed on this objective marker by enemy operatives during this turning point. |
|
Destroyed Objectives: Each operative marker is set up under a pillar that is part of a terrain feature in this killzone. If all objective markers that are under a terrain feature are destroyed, any parts of that terrain feature with Heavy trait are treated as Light instead.
PRIMARY OBJECTIVE
At the end of each Turning Point, you score VPs as follows:
- If any objective markers were destroyed, the Attacker scores 1 VP.
- If any of the Defender's operatives performed the Defuse Explosives action and no objective markers were destroyed, the Defender scores 1 VP.
At the end of the battle, you score VPs as follows:
- For each objective marker that has been destroyed, the Attacker scores 4VPs.
- For each objective marker that remains on the battlefield, the Defender scores 4VPs.
NACHMUND
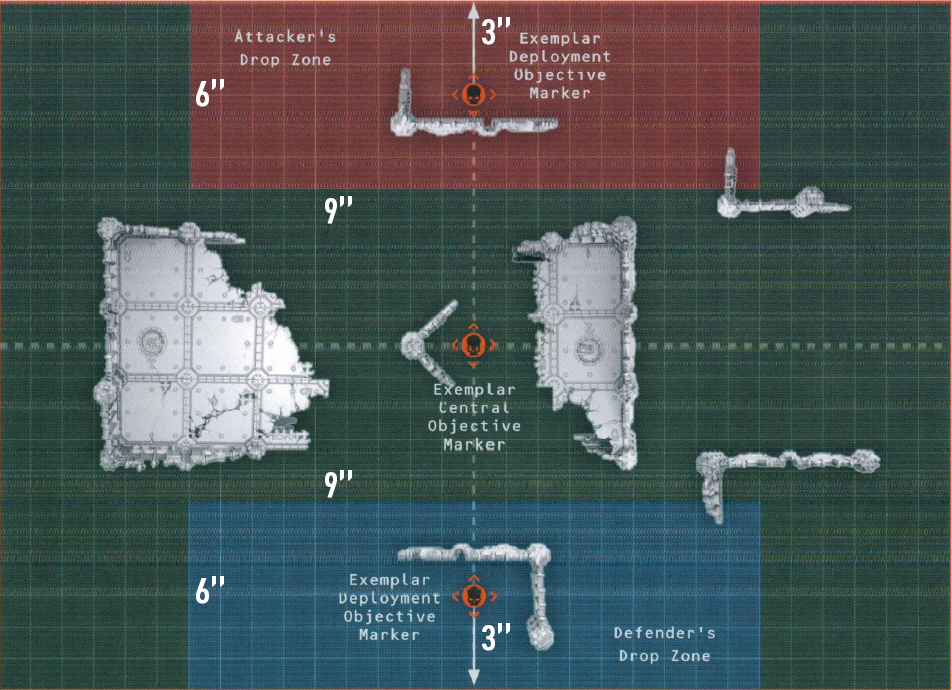
1.1: STEAL THE CIPHERS
SCENARIO RULES
The Defender's operatives cannot perform the Interact action with Hatch.
The Attacker's operatives cannot perform the Interact action with Hatch until both the Exhaust Vent terrain features are closed as the result of Interact action.
PRIMARY OBJECTIVE
- At the end of each turning point, if none of the Hatch terrain features have been explored in the battle, the Defender scores 2VP.
- At the end of the battle, for each of the Hatch terrain features that were explored, the Attacker scores 6VP.
1.2: SCAVENGING THE WRECKAGE
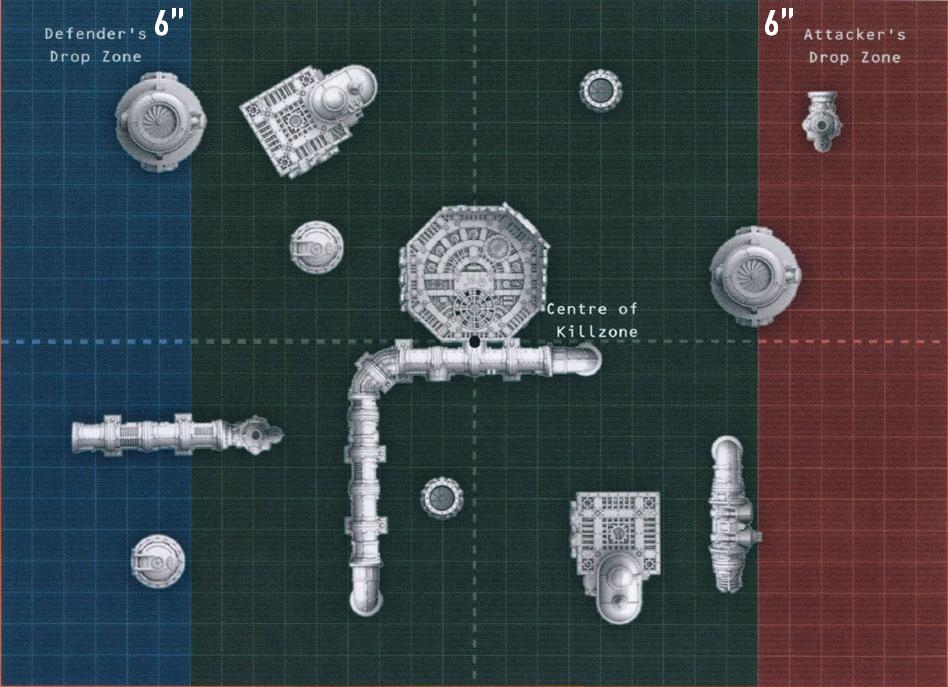
SCENARIO RULES
Worker Dataslates: The Pick Up Marker action can be performed upon objective markers. Each operative can carry up to 2 objective markers.
PRIMARY OBJECTIVE
At the end of the battle, for each objective marker friendly operatives are carrying, you score 2VP.
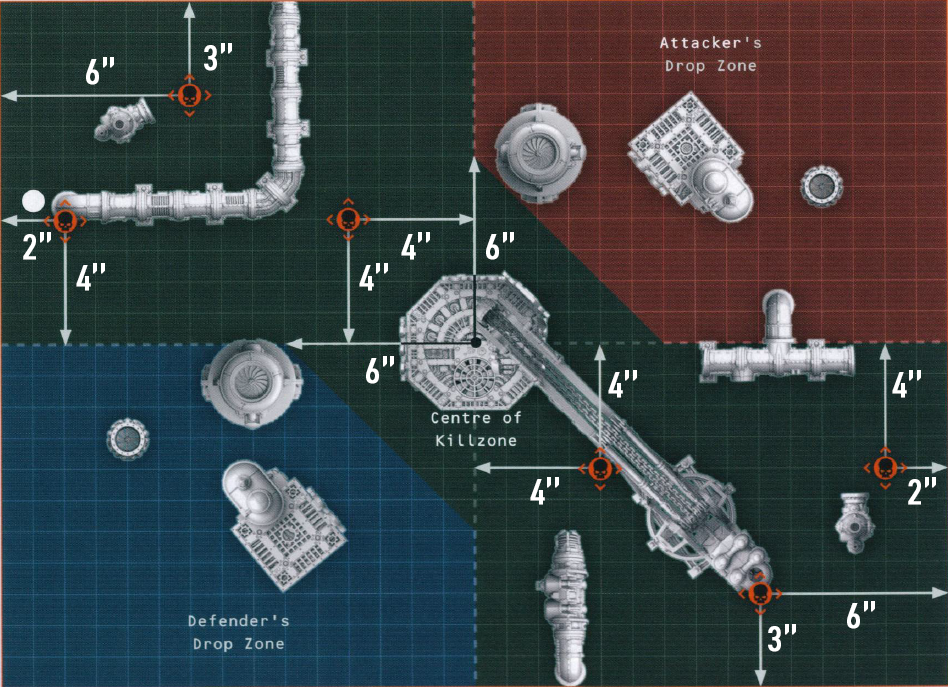
1.3: RECOVER WRECKAGE
SCENARIO RULES
The Defender's operatives cannot perform the Interact action with Hatch terrain.
The Attacker's operatives can perform the following mission action:
| SEARCH WRECKAGE | 1AP |
|---|---|
|
An operative can perform this action while within control range of an objective marker. Roll D6. On a 5+, that objective marker has the intel. Add 1 to the roll for each objective marker that was removed from the killzone. If the objective marker has the intel, remove all other objective markers from the killzone. If it does not have the intel, remove that objective marker from the killzone. |
|
The Pick Up Marker action can be performed upon the objective marker that has the intel by both Attacker's and Defender's operatives.
PRIMARY OBJECTIVE
At the end of the battle:
- If an operative from a player's kill team is carrying the objective marker that has the intel, that player scores 12VP.
- If the objective marker that has the intel was not discovered, the defender scores 4VP.
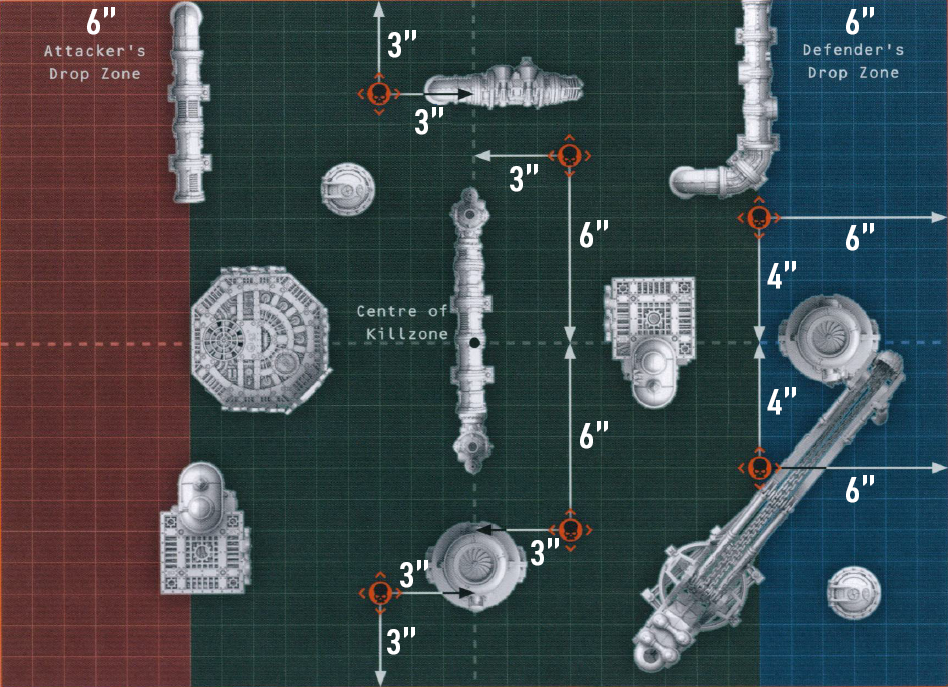
3.1: COUNTER-ATTACK
SCENARIO RULES
Boxed In: in the Scouting step, if the Defender selects the Reposition option, do not resolve it. Instead, the Defender may remove one of their operatives and set it up again anywhere within their drop zone. Note that in this mission neither player has a killzone edge.
Lockdown: The Pick Up Marker action can be performed upon objective markers.
Defensive position: While a Defender's operative has the Conceal order and is within the Defender's drop zone, it is always treated as having the Conceal order regardless of any other rules.
PRIMARY OBJECTIVE
At the end of the battle:
- For each objective marker friendly operatives are carrying, you score 2VP.
- If there are no operatives from the Attacker's kill team wholly within the Defender's drop zone, the Defender scores 4VP.
- If there are any operatives from the Attacker's kill team that are wholly within the Defender's drop zone and not Injured, the attacker scores 6VP.
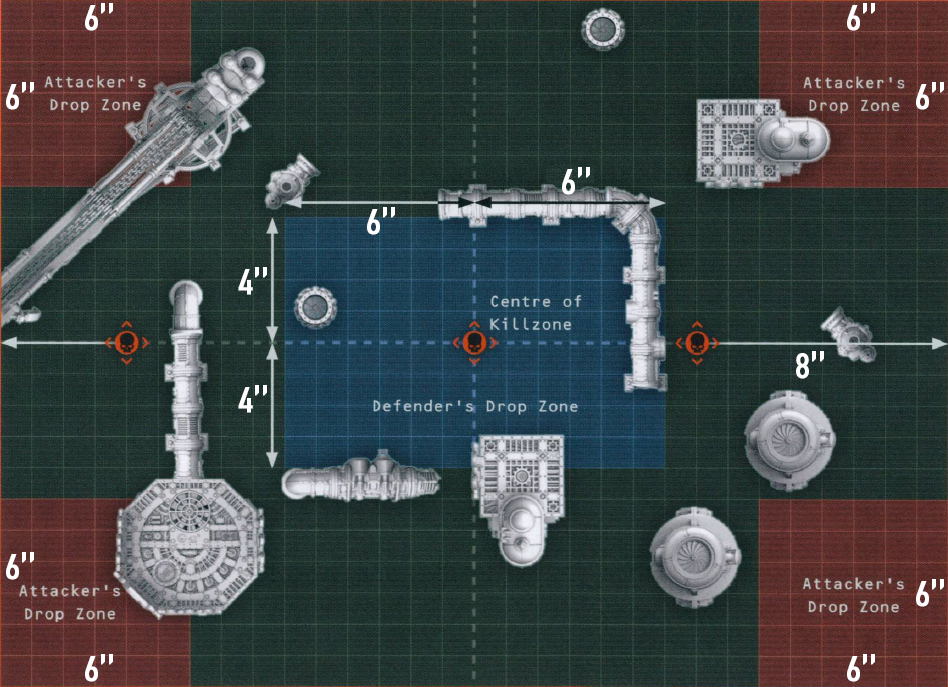
3.2: REACTIVATE DEFENCE GRID
SCENARIO RULES
Failing Defence Grid: At the start of the first turning point, the Defender rolls one D3 to randomly determine which objective marker is the failing node.
The Defender's operatives can perform the following mission action:
| REPAIR NODE | 1AP |
An operative can perform this action while it controls the objective marker that is the failing node. That objective marker stops being the failing node. At the start of the next Turning Point, the Defender rolls one D3 to randomly determine which objective marker is the next failing node. |
|---|
SCENARIO EQUIPMENT
One operative in the Defender's kill team can be equipped with the following equipment for the battle:
REPAIR DIAGNOSTICATOR 3EP
When rolling one D3 to determine which objective marker is the failing node, if an operative with this equipment is within 6" of one or more objective markers, you can re-roll the D3.
PRIMARY OBJECTIVE
- At the end of each Turning Point, if an operative from the Defender's kill team performed the Repair Node action during that Turning Point, the Defender scores 3VP. Otherwise, the Attacker scores 3VP.
- At the end of the battle, for each objective marker the Defender's operatives control, the Defender scores 1VP.
- At the end of the battle, for each objective marker the Defender's operatives do not control, the Attacker scores 1 VP.
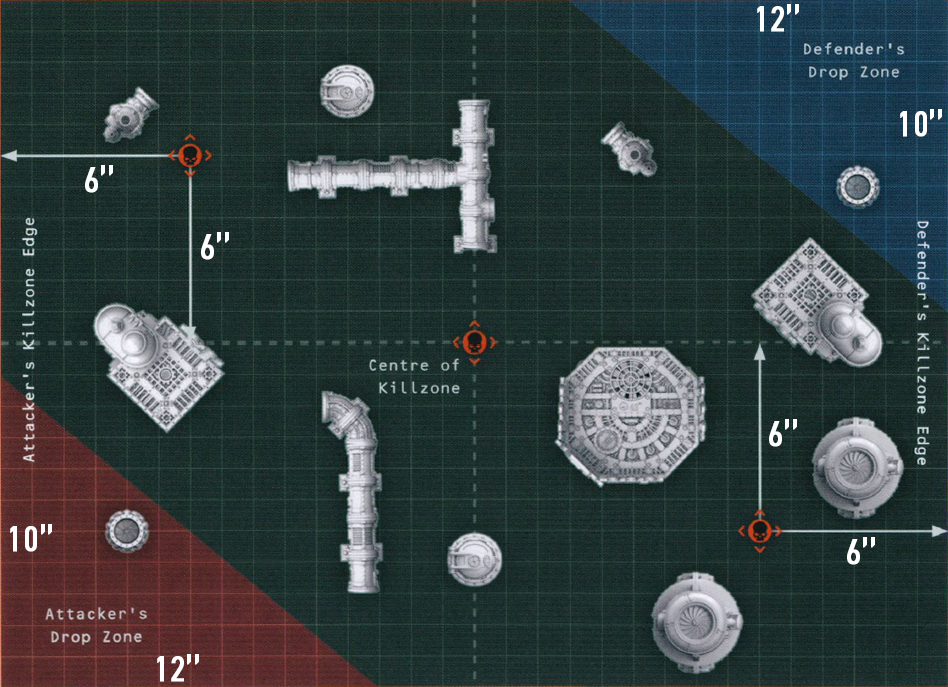
3.3: DESTROY THE SUBSTATION
SCENARIO RULES
Primary Goal: Operatives cannot perform the Interact action with Hatch terrain.
Split Up: When the Attacker sets up their operatives, they must alternate which of their drop zones their operative is wholly within. Note that in this mission, neither player has a killzone edge.
Explosive Reaction: The Attacker's operatives can perform the following mission action:
| ENERGY OVERLOAD | 2AP |
An operative can perform this action while within control range of the Power Relay Substation terrain feature's Power Cores. The Power Relay Substation is overloaded and destroyed: Each operative within control range of that terrain feature suffers D3 damage. That terrain feature loses all traits apart from Light. |
|---|
SCENARIO EQUIPMENT
Operatives in the Attacker's kill team can be equipped with the following equipment for the battle:
DEMOLITION CHARGES 4EP
This operative can perform the Energy Overload action for 1AP less.
PRIMARY OBJECTIVE
At the end of the battle, if the Power Relay Substation is destroyed, the Attacker scores 12VP. Otherwise, the Defender scores 8VP.
